Tuesday, July 27, 2010

Renaissance Hat

Here is a sneak peek at one of my Renaissance Hats. I am making 3 hats this year, one for my friend Anna, my sister and myself.

Sorry for the poor picture with my messy mess of a hair, it was late and I was trying to take a quick pic before bed.

I used a buckram frame, covered the top with velveteen, adorned the edge with a green and gold cord and stiched on a jewel I had from a chandelier earring (I lost the other earring but kept the other for the gems). I attached a small hair comb underneath to secure and a bit of satin on the underside, since the buckram is stiff and might pull some loose hairs out.

How does it look? I will post more about them once I get them finished :)

Oh here is my first hat I made for a SteamPunk Costume back in October... I can't believe I didnt blog about this :-/

Monday, July 26, 2010

First Veggie harvest!


Here are my first Veggies of the season Yum yum.

Friday, July 23, 2010

Lime Crime Offer!!

All orders of $50+ receive a free gift ($48 value) with code DOUBLERAINBOW
Click here to check out her awesome eye shadows and lipsticks

I own the Mermaid eye shadow and the Countessa Fluorescent lipstick and absolutely LURVE THEM!!!

Tuesday, July 20, 2010

Follow Me Back Tuesday!

Follow Me Back Tuesday is another day of the week that you can gain more followers and find other great blogs to follow on a weekly basis. Follow Me Back Tuesday is hosted by Survey Junkie, Little Yaya's, Review Retreat and Boobies, Babies & A Blog


It's a great way to start off your week and get more Followers !!

How it Works:
1. Follow all 4 hostesses above, then as many other blogs as you would like (Be Sure To Comment So We Know Who/Where To Follow Back) .
2. Go to Reveiw Retreat and add your blog to the list (only have to add once ).
3. Grab their button and the link code to post on your blog.
4. After you follow a new blog make sure you leave them a comment letting them know that you are now a follower so that they can follow you back, and please follow others back if they leave you a comment that they follow you.
5. We would love for you to help spread the word by creating a Follow Me Back Tuesday Blog Post. It will certainly help spread the word faster, which will lead to more blog followers!

Wednesday, July 14, 2010

Chartpak Blender - Wall Art

One of the major reasons I have not posted pictures of my remodeled bathroom is 1. I still need to find or just paint the old towel rack (lazy) 2. because I bought some really cute wall stickers from IKEA that will NOT stay on the walls :-/ so I have been looking into some other way to maybe paint these on instead. Until I found Chartpak Blender
Chartpak Admarker P-o Blender

Chartpak Blender can be as useful for home decor projects as well as for art projects. I am going to use it to transfer a black and white copy to my wall. The blender loosens the ink from regular old Xerox copies, allowing it to then be transferred by burnishing the back of the paper with a soft pencil.


Tape the "transfer" paper to the wall where you want it, then cover the back of your image with the blender. After covering the image, burnish the area with a soft-lead pencil. The black ink will transfer right from the paper to the wall. From my understanding, the image will look a bit more gray than black.

Get a Chartpak Blender at your local art supply shop or online at Amazon.

Tuesday, July 13, 2010

Renaissance Garb

For who enjoy attending the Renaissance Festival, and maybe want to start looking at costumes, or new ones, I have a nice list of shops that I have either purchased from or simply adore their work.
Over the years I have slowly compiled a ridiculous list of resources, links, images, patterns, costume stores etc.

First up, Research. The Renaissance was a cultural movement of perspective art and reformation of education that spanned the 14th to the 17th century, which started in Italy and quickly progressed through the rest of Europe. Here are a few links for research I have found.

Below are a few stores, with appx. price ranges and samples of dresses from their stores.

Renaissance Dress "Starter Packs" - $100-$250

 Your Dress Maker - $80 and up

Some of the High End Dresses are based on some paintings of the Tudors.

The Tudor Shoppe - $89 and up

Etsy Shops
LoriAnn - $85 and up

The Wenches Wardrobe - $145 and up

Camelots Closet - $38 and up

A few key things that I have found helpful:

  1. Chemise - If its just an over dress, it means you will want a white (or colored!) chemise for under the dress to peek through.

  2. Bloomers - they are handy and very comfortable for all-day wear. I have used a pair of cropped leggings too!

  3. Hoop skirt - if you want a full skirt, get one of these. I am doing it for the first time this year and found some nice cheap ones on ebay like this.

  4. Accessorize: Go nuts, fox tails, belts, jeweled hair nets, french hoods, etc.
Do you have any fun tips hints or awesome costuming?

Monday, July 12, 2010

DIY Re-Wireing sound system

 Ok so we bought a sound system before the tv and media center...alright so the furniture is totally more important to me than it is to the husband hehe.
We finally decided to wire the surround-sound speakers correctly. There are three speakers in the front: Center, Left and Right. Two speakers in the rear: Left and Right and a Sub woofer.

So the sub woofer has been chilling as the wii remote induction charger station - seriously drives me crazy, I was very excited to get it moved. While the rear two speakers chilled out in the unit.

 We pulled the tv out from the wall where the previous owners had wired the cable through the in-take duct to the laundry room, we fished the Rear Left and Right wires along with the modified Sub Woofer wires through the same postion.
 Handy husband came up with the idea to snake all three of the wires from the laundry room through the floors using Fish Tape to the opposite wall. While drinking his coffee at the same time of course.


We pushed the Fish Tape between the floor joists and using a pair of pliers pulled the fish tape up to through the side of a floor vent. Then tied the three wires to the end and slowly pulled the wires back to the laundry room then up the intake vent to hook up to the TV. The speaker ends, we then pulled them through a hole drilled into the floor joist into a created hole using a one-tooth hole cutter, which will later cover using a plate of some sort
Clip those little wires into the back of the speakers and tada we have speakers behind the couch now. We made these cute little shelves ourselves too!

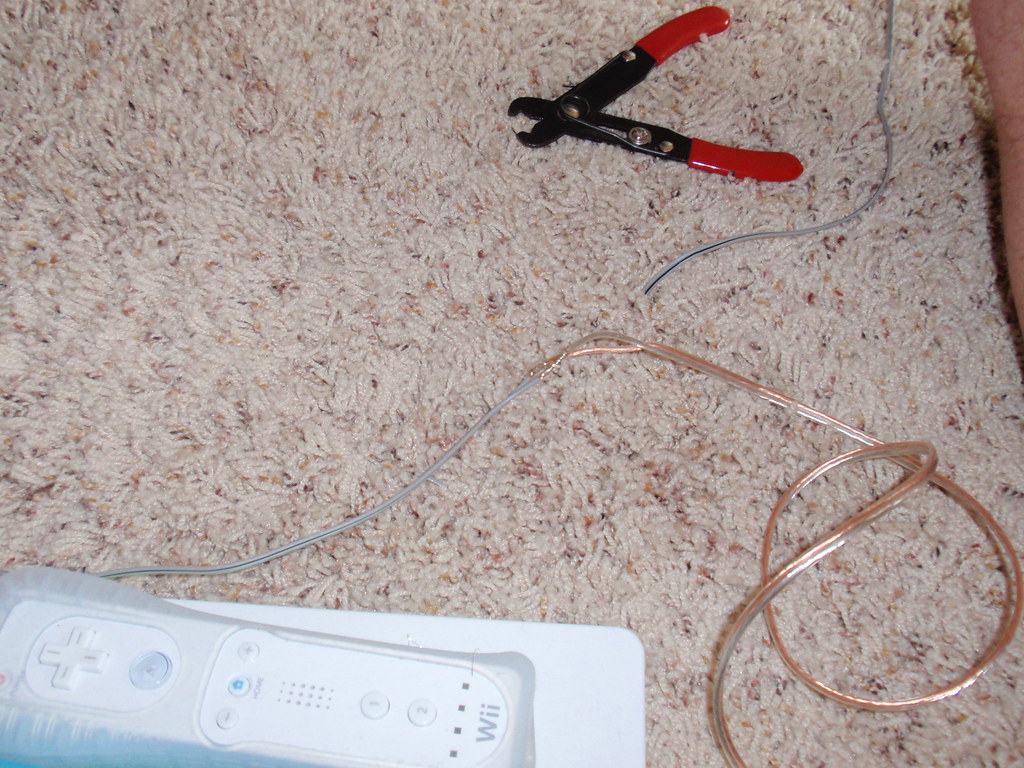
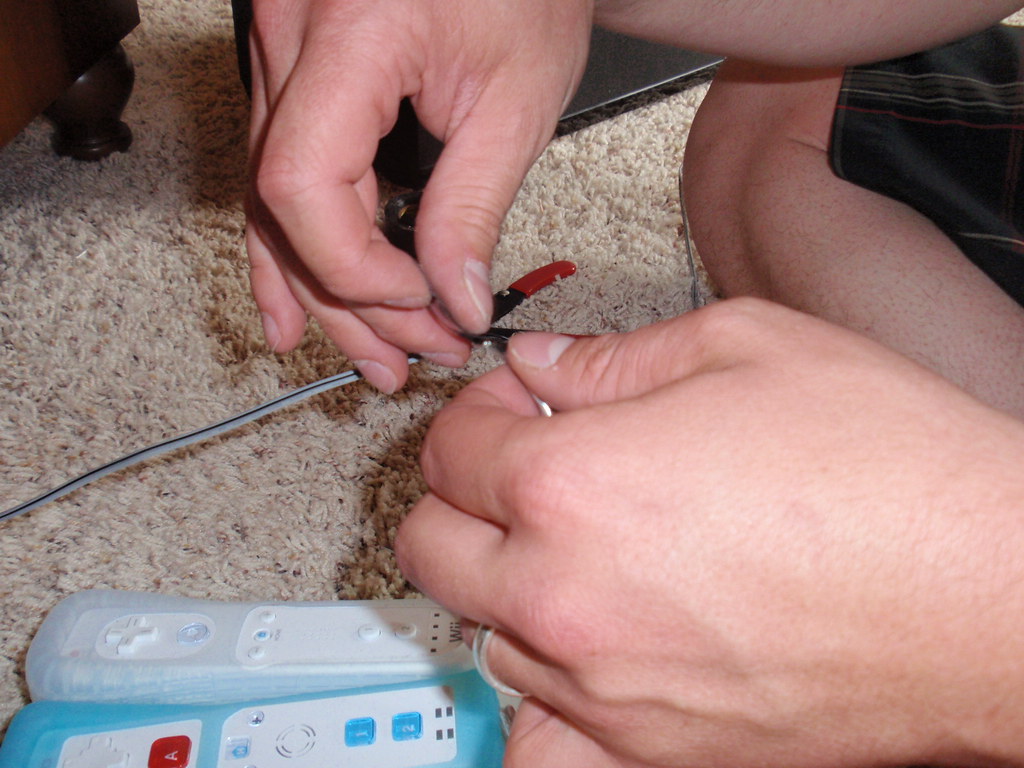
The sub-woofer was a little trickier. The wire was only about 2.5 feet long which would never have made it under the floor then to the corner behind the chair, so we snipped the cord and soldered to silver and copper speaker wire from Homedepot:
Cut
Solder
Tape - with electrical tape to keep the wires insulated

Funny side note: we had the sub-woofer plugged into the wrong input before so when we re-wired it and tested it for the first time, it was 1000 times better. Gotta love me some bass.

Now we just need some cute shelves to hold our little speakers up! Maybe like this from Target?