Thursday, May 24, 2012

Kitchen Update 4

Ceilings, Lights, Cabinets, Oh my! hehe

First we put up plastic, then screwed in the drywall.We hired someone to do the mud, sand, and texture.


They finished mudding and the knock-down texturing on Saturday. The ceiling still needs to be primed and painted, oh darn (I love painting), but I went ahead and painted around all of the fixtures so I could put up some of my lights Wednesday night.


Sunday we removed the two layers of linoleum flooring, this must have been stapled down by a maniac, I think there were staples every inch... it was tedious to say the least


Monday, cabinets went up!! This took just Monday and Tuesday night. Thanks to the help of some amazing friends we were able to hang them ourselves.
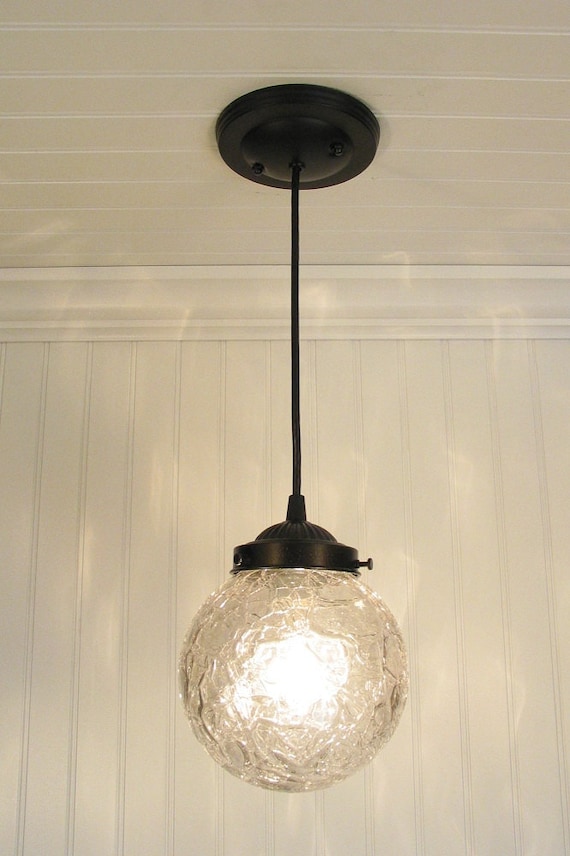
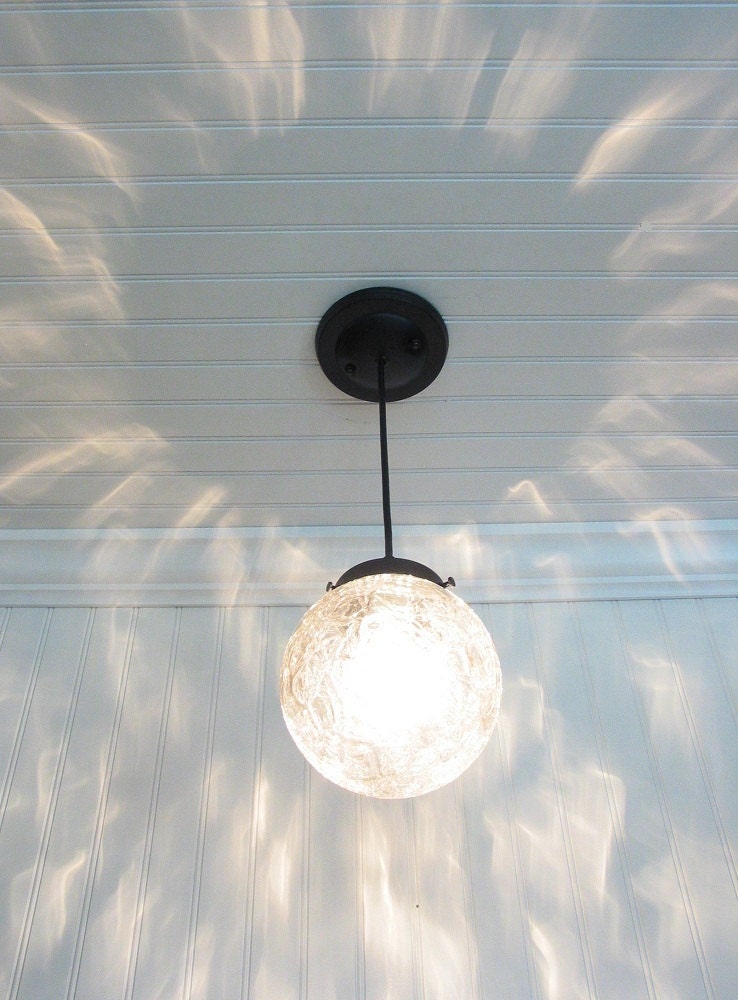
Next up, island pendants that I bought from LampGoods on Etsy. I love love them!

And here is what it looks like today, look at those lights!


Here are a few shots of the island pendant lights, they have the Edison bulbs in them. They look amazing, but I couldn't get a good shot of the effect they have on the room. And I finally got the chance to put most of my furniture back and vacuum! So nice to have a semi-functioning living room again.


Have I mentioned that I love these lights?!


What we have left to do: 
  • Flooring, rip out the rest of the carpet and nail down Walnut engineered hardwood. (on order, we expect to get it in on Friday)
  • Lighting: Pick up new ALANG fixture for entryway at Ikea, Find a pendant for over the sink, and the hallway
  • Order Granite, we need to pick a color still (Yikes!) and get the company to measure it out.
  • Hook up stove and microwave
  • Find a new Fridge (we might wait a while on this one)
  • Put up island beadboard
  • Install Kitchen sink and faucet
  • Paint ceiling
  • Install crown moulding


Thursday, May 17, 2012

Kitchen Update 3

The island pendant lights have been ordered!


I couldn't decide between two options, so I ordered them both to see how they look with the cabinets. The gal at LampGoods has been wonderful and am I able to check out both pendants and send back the pair I don't wish to keep. 


A clear globe pendant similar to the one in my MoodBoard:
And a crackled glass pendant:

Look how the light hits the ceiling!


So far, the ceiling is ready for the drywall guys to start the knock-down texture, we're just waiting for the bids to come in, which unfortunately is taking longer than we hoped. Tonight I plan on getting all the tools and extra furniture out of the dining area for some move-ability, clean the old appliances to sell on craigslist or a few family members were interested in them for their cabins, and move out the dishes from the remaining base cabinets.


Tomorrow we rip out the old kitchen floors. Yes as in plural, there are two sets of linoleum in the kitchen that needs to come up for the new wood floor. We also need to get the dining room carpet removed and re-stretched to tack down since we are keeping the carpet in the living room.


And this weekend... the cabinets are in if everything goes to schedule. According to Menards handy order tracker, were right on schedule!
I am feeling overly optimistic, and hoping this weekend we'll have ceiling, cabinets and flooring done (keeping fingers crossed). I'll let you all know how it goes ;)


Wednesday, May 9, 2012

Kitchen update 2 - The electrical

And there was light!
 Pardon our mess, the can lights were installed last night and look incredible! The living room cans are set on a dimmer switch for great movie lighting!


Here again is a before of the old wiring that was inside the wall and the light that was over the sink kind of hanging free there.

They cut grooves into the studs and put plates over the wires to move around the electrical wiring from inside the old soffit and added an outlet for the over range microwave.
  
 We also had our internet hardwired in for our Playstation, where we also stream Netflix or Hulu. Also a coax jack so we don't need to drag a cord across the room just to watch TV. It was wired into the old wall we tore down and snaked up through the air intake vent. 

 Here is the kitchen with temporary bulbs in for the pendant lights whenever I find them and the wall to the right with the new switch plate for the kitchen and dining lights (remember those were on the old wall).

And another view, a shot of the corner to the entryway. I am getting excited to start building that half wall behind the TV now.
(Yes, we are watching New Girl hehe)


Tuesday, May 8, 2012

Kitchen Progress Uno

Ok, here is a quick run-down of what we have today.

We started by wanting to check inside the wall we are tearing down for potential electrical issues. The cut out below is the telephone line.


(ps notice a little layout change from yesterday's post? Lots of changes to the living room to come too! 
Oh and look at that apple tree in the window full of blooms!! Love! 
The tape line on the floor was an option we were looking at to have the island face the living room, we decided it would be easier to face the dining room since the stools on the island will want to be on the hard wood floor.

Moving on, one hole became three:

Then we just gave in and tore out the whole wall (this went pretty quickly, we did this one Thursday night and one Friday night after work to pull out the upper cabinets).


Next up, we decided to remove the popcorn texture from the ceiling ourselves, it is actually a lot easier than I had initially anticipated. The prep work however, was very tedious. I did a bit of googling and found this video very helpful by Ron Hazelton . Just a quick how to for those who don't want to watch the video: Turn off all the electrical in that room, tape plastic over the walls and floor to protect from the water. I then used resin paper over the plastic on the floor for quick clean up too (you wont regret it, just scoop up all the paper and toss all of it in the trash). Use a small garden sprayer to get about a 5 square foot area damp and let sit for about 10 minutes then I used about a 3" flat scraper and start scraping!


Putting up the plastic is really hard to do alone, how does Dexter do this by himself!? (PS the aqua lanterns were prototypes for pendant lighting that I will post about in a future post).

One other frustration I had, was the plastic was too heavy and started to fall within 30 minutes of me finally getting it all up.


We did things a bit out of order, but the hubs was out most of Saturday so I did some of the  scraping earlier mention until he got home. So, then we worked on the soffits. And with that,  down came most of the insulation during that too, so we will be adding to the list to have the insulation re-blow in the attic when we finish.


Here is the living room prepped to scrape using a lighter plastic, we did use the heavy plastic on the floor instead, which worked perfectly.


Here is the wiring and plumbing that needs to get reworked from inside the old soffit (electrical to be done later):


Here is the after on the plumbing work, we used LaVahn Brothers which were wonderful. Very professional and a good price. I was also able to use a coupon from their site to get $25 off too!


We were able to get the soffits down, the popcorn removed from the kitchen, dining, and half the living room in 2 days over the weekend.


(PS more re-arranging! We have now added "Build a half wall in the corner for the TV" to the list).

Monday, May 7, 2012

Kitchen Remodel - The plan

Finally, the plan for the kitchen remodel! (well technically we've already started, so tomorrow I will be posting a progress post)


Here is the mood board


Here are some Before pictures of the kitchen 


The wall we are removing that separates the living room from the kitchen:

And a rough layout of the before:
Here are a few to dos:
  • Remove all cabinetry and order new ones in almost-white color with contrasting dark island
  • Order farm sink
  • Get rid of the wall between the living and kitchen to create an open floor plan
  • Knock down the sofits around the kitchen
  • Electrical/Lighting: The wall between the two rooms had the kitchen and dining room switch plates and two outlets that will need to be reworked. Add two pendant lights over the island, install a can light over the stove and re-work the existing light over the sink  for a pendant light. And since were at it, add a few can lights in the living room which currently does not have any ceiling lighting.
  • Plumbing: move pipe that was in the north wall sofit
  • Scrape the popcorn off the ceiling in the kitchen, dining, living, and the hallway to the bedrooms and bathroom and the bathroom ceiling, repair drywall, add a knock down ceiling and repair old light fixture holes.
  • Remove the carpet in the dining room, add engineered hard wood in a dark walnut through kitchen and dining rooms.
  • Install new cabinetry, cut out insert for farm sink
  • Order granite with "antique" finish which is a more matte finish, not as shiny as you typically see on granite
  • Order back splash tile, I fell in love with this Beveled Arabesque Tile
  • Update kitchen window trim, add decorative molding around all three rooms
  • Stainless Steel appliances, over the range microwave instead of using a counter top microwave to add more counter space.


Here is a rough drawing of the after for the kitchen. 
 And here is a sneak peek of the progress today, more to come tomorrow!