Monday, July 23, 2012

Kitchen Update 9: Tile Up!

This past weekend was pretty productive. I finally have the tile all up and ready for grouting. This took me 6 hours on Saturday and 8 hours on Sunday. Phew! I will most likely wait until the day after tomorrow night to grout since the directions on the tile adhesive recommend waiting 24 hours (better to be safe than sorry).
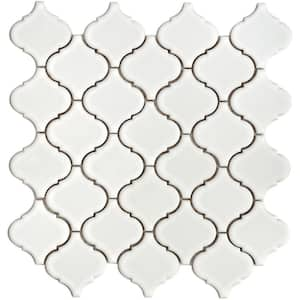
Here is a view of the tile by the sink, I left the rosin paper up to protect the granite for when I do end up grouting. The tiny pieces at the top and the bottom were loads of fun to nip with tile nippers and piece in (I am of course being a tad sarcastic)
Here is a view of the stove and look at the side of that handsome new fridge <3
And standing back
Love it, so far the tile I used for the back splash absolutely exceeds my expectations and was SO worth the hand cramping 14 hours of nipping, ceramic bits cutting my hands and feet, back aching angles I had to bend at to get the pieces lined up nicely in tight corners, and chunks of tile adhesive sticking in my hair still on Monday morning. 

Oh and I finally took a pic of the granite up close the color is a little more gray than in reality but you can see the cool flecks:


We were able to have a little non-remodeling fun as well. We went up to Station 4 in St. Paul to see my all time favorite metal band In This Moment
These are my favorite 3 songs:
DISCLAIMER: Contains some explicit content

And, I got the chance to chat with, get a pic signed, and my picture taken with the lead gal, Maria Brink. She is a very sweet, super cool chic and I was thrilled to meet her! Needless to say, I had an absolute blast at the concert.

Back to the kitchen, now all that's left:

  • Paint the section over the sink, new color in the dining room and to touch up the corner separating the fridge from the living room, window frame
  • Cut and install the crown molding
  • Get the carpet re-stretched and install the threshold separation
  • Organize and put the kitchen away (Yes I still have about 90% of the items in my guest room) - lazy
  • Get rid of the rest of the trash in the garage. The WM Bagster Bag I posted here went off without a hitch and we got rid of over half of the items we would have a hard time getting rid of ourselves.
  • And I am still waiting for my bead board to come in...UGH not happy with Menards on this one thing, everything else has been a flawless experience.
  • Sew the curtains for the living, dining and kitchen.

Saturday, July 14, 2012

Next Renovation Project: Master Suite Addition


This may be a bit out, but I have "the renovation bug" now. Our future big renovation project is to build an addition over the garage as a Master Suite. My husband and I are… cozy in our current 10x11 bedroom. We added two wardrobes on each side of the bed for additional closet space but still have a dresser cramped at the end of the room full, a small closet stuffed and the spare room closet storing my dresses since neither of the other closets have long enough racks for hanging dresses. When seasons change I get a little creative storing off-season items in totes in the master bedroom closet's odd space (that takes up half the closet).  Having a master suite would give us that extra room for kids when we start having them without losing our spare room and have a relaxing escape for the two of us to spend quiet cuddly time together. Not to mention a bathroom we could both use (I currently use the basement bathroom to get ready because of the lack of outlets and counter space to get ready, while my husband uses the bathroom across the hall from our current room). And a walk-in closet full of fantastic cubbies, storage, and hanging room for both our clothes. Bliss.

Here is our current bedroom through the doorway
The odd space I loosely call storage space in the closet

A rough estimate of the current space (I love floorplanner.com)

And here is the proposed floor plan for the new addition


Friday, July 13, 2012

Kitchen Update 8, Tile delivered!

Looky what was delivered today!


It is stunning in person!

And remember my worries from this last post about the possibilities of breakage during shipping?

This thing was packed hard core! Two layers of industrial strength bubble wrap wrapped around each cardboard box of tile. then the tile has nice plastic pieces under each square of tiles stacked in the box.  Nothing was going to move in this box!


Hopefully we'll get them put up this weekend!

Monday, July 9, 2012

Kitchen Update 7

The weekend before last was not real great in the progress department. It involved shopping for the back splash tile for hours to no avail, serious lack of motivation on my part painting the ceiling, and a CAT-tastrophie involving a Giles cat leaping onto my pendant lights I had tucked away for the granite people to install the island piece without breaking the bulbs, well Giles successfully broke one light and both $8 light bulbs. Then dashed across the room, through the white ceiling paint and across my bran-new kitchen floor. Pretty paw prints all about. And the bead board we ordered for the back of the island was 4 inches too short.


This weekend was MUCH more productive.  We re-ordered the correct size bead board, which will take a few days to deliver, but the folks at Menards were kind enough to put a rush on it, I'll keep ya posted.  Ceiling finally Painted. Finally found a fantastic over-the-sink Pendant light from Lowes which was only $54, much less than I planned.


Hardware dilemma from this post resolved and installed.


Bar stools. Check


Toe kicks installed. Check
We re-routed our air-intake ducts to flow from under our island instead of from the side, which I think look great:


I received the replacement light from LampGoods, where I originally ordered them from in great time!


Hubs got the garage mostly cleared out using WM Bagster bags!


Plumber came early Monday morning to get the garbage disposal hooked up and some fancy maneuvering of the old left drain and dishwasher drain.  We used LaVahn Brothers again. If you recall, we used them back in May to re-route some other pipes.


I can see the finish line! We just need to install the crown molding, paint the window, get the carpet re-stretched and install the flooring divider, and install the back splash.  We are now just debating between two tiles for the backsplash as mentioned back at this post.  I am really irritated by the fact that everything I want is only available online, I am really worried that I will have broken pieces, delays, discontinued shapes or colors, etc. So, fingers crossed, we'll see how it goes. Here are the two tiles:
Lantern Tile from HomeDepot
Grecian White marble from HomeDepot

Take a look at what it looked like before again:


Progress:

Progress Today:


Friday, July 6, 2012

Kitchen update 6

Happy Belated 4th post!

A little Christy-colored Independence day table decoration


I worked on a little painting, while hubs tacked down the center island:


Then it all went down the drain, or should I say my cat, Giles went down on my lights I took down for the Granite guys to install the island piece. UGH!